How to Update Your WordPress Site Without Coding
Update WordPress content, design, plugins and menus without coding using the Block Editor and AI tools. Backup, test on staging, and maintain regularly.
How to Update Your WordPress Site Without Coding
Updating your WordPress site is easier than ever, even if you don't know how to code. Tools like the WordPress Block Editor and AI-powered platforms such as Kintsu.ai allow you to make changes using drag-and-drop features or natural language commands. Here's what you can do:
- Edit Content & Design: Use tools like Kintsu.ai to update text, tweak layouts, or adjust colors by typing simple instructions (e.g., "Change the header to blue").
- Backup First: Always back up your site before making changes to avoid losing data.
- Use Plugins for Features: Add functionality like contact forms or newsletters without coding by installing and configuring plugins.
- Test & Maintain: Regularly test your site on desktop and mobile devices, and schedule updates during low-traffic times.
Whether you're managing pages, posts, menus, or adding new features, these steps ensure your site stays updated and functional. With AI tools, you can save time and focus on growing your business, all without needing technical skills.
Update WordPress Plugins without Breaking your Website!
Preparing Your WordPress Site for Updates
Getting your WordPress site ready for updates isn't just about clicking a button - it’s about taking steps to ensure everything runs smoothly. Proper preparation helps you avoid disruptions and keeps your site safe during the process. One key step? Always back up your site before making any changes. Once you’ve got everything in place, you can confidently proceed with updates, even using AI-powered tools.
Check Access and Theme Compatibility
Start by logging into your WordPress dashboard with an administrator account. Full permissions are essential for making changes across your site. Once you’re in, check that your current theme works with the block editor. To avoid surprises, always test updates on a staging site before applying them to your live site.
Many hosting providers include staging environments as part of their service. Review your theme’s compatibility details and developer changelogs to understand what’s changing with updates. Remember to update your themes and plugins before tackling the WordPress Core update. This order helps avoid compatibility issues. After confirming access and theme readiness, the next step is securing a reliable backup.
Back Up Your Site
Backing up your site is non-negotiable. This includes all WordPress core files, themes, plugins, media, configuration files (like wp-config.php and .htaccess), and the database. Store these backups in multiple off-site locations for added security. Backups are your safety net against issues like theme or plugin conflicts, broken layouts, data corruption, hacking, or accidental deletions.
Use a mix of cloud storage, your local computer, and external drives to keep your backups safe. Many hosting providers offer built-in backup tools, but WordPress backup plugins can also automate the process, saving you time and effort.
Learn the WordPress Dashboard
Spend some time getting familiar with the WordPress dashboard - it’s your command center for managing content, pages, and settings without needing a developer. The dashboard is the easiest and most recommended way to update WordPress core software, themes, and plugins.
Focus on the sections you’ll use most often: Pages (for static content), Posts (for blog entries), Appearance (for theme settings), Plugins (for added features), and Settings (for site-wide configurations). Use the Block Editor to manage text, images, and media layouts, and always preview changes using the "View" option before publishing them live. To minimize visitor disruption, schedule updates during low-traffic times like late nights or weekends. Understanding the dashboard is key to smoothly integrating AI tools into your update process.
Updating Content and Design with Kintsu.ai
Kintsu.ai makes updating your WordPress site as simple as typing out what you want. With natural language commands, you can describe the changes you'd like to make, and the AI takes care of the rest. Whether you’re fine-tuning text or revamping entire sections of your site, it handles updates smoothly.
Connect Kintsu.ai to Your Site
To get started, log in to Kintsu.ai and connect it to your WordPress site. You’ll need your WordPress admin credentials to establish a secure link. Once connected, the Kintsu.ai interface integrates directly into your site editor, making real-time updates a breeze. This connection ensures the AI understands your site’s structure, so it can apply changes effectively.
Edit Text and Content
Updating your site’s content is as easy as giving instructions in plain language. For example, you can say, “Change the headline in the Services section to ‘Professional Web Design Starting at $499,’” or “Update the contact button text to ‘Get Your Free Quote Today.’” The AI can handle a variety of tasks, from shortening paragraphs to rewriting sections with a more polished tone.
If you’re adjusting prices, be specific, like “Change the monthly subscription price from $29.99 to $39.99.” For larger edits, break them into smaller, manageable steps, focusing on one section at a time. Once the content is updated, you can move on to refining your site’s layout and style.
Change Layouts and Styles
Redesigning your site’s look doesn’t require any design skills. Simply type commands like, “Make the heading font bold and modern,” or “Use brighter colors for the call-to-action buttons.” The AI can update fonts, tweak color schemes, and rearrange page sections based on your descriptions. For best results, be specific - say “make the button blue” instead of “change the button.” If you’re unsure what works best, you can even ask the AI for suggestions, such as, “What font styles would match my homepage design?” This way, you can preview options before committing to any changes.
Review and Apply Changes
Once the AI has made the updates, preview your site to ensure everything looks right. Check that text changes are accurate, prices are displayed correctly in USD, and design tweaks match your vision. If something seems off, use the undo button in the top navigation to roll back the change, then adjust your prompt for more precise results. When you’re happy with the updates, click the save button in the upper-right corner to finalize them. This review-and-save process ensures you maintain full control over how your site appears to visitors.
Managing Pages, Posts, and Menus
AI tools can make managing your website more efficient, but it's still helpful to know the basics of WordPress content management. The WordPress Block Editor provides all the tools you need to create and organize your site’s content. To add a new page, go to Pages > Add New in your dashboard. For blog posts, select Posts > Add New. If you want to edit existing content, navigate to Pages > All Pages or Posts > All Posts and click Edit under the item you'd like to update.
Create and Edit Pages and Posts
In WordPress, every element on your page is a block that you can add, move, or delete. Click the plus icon to insert blocks such as paragraphs, images, headings, or buttons. You can drag blocks to rearrange them and use the toolbar to format text, adjust alignment, or add links. For instance, if you’re creating a services page, you might start with a heading block for "Our Services", follow it with paragraph blocks detailing each service, and finish with a button block that links to your contact form.
Update Navigation and Site Settings
Your website's menu determines which pages show up in the navigation bar. To make changes, head to Appearance > Menus in the WordPress dashboard. Here, you can add or remove pages, create dropdown menus, and reorder items by dragging them into place. For basic site settings, go to Settings > General. This is where you can update your Site Title, Tagline, and Time Zone - selecting options like Eastern, Central, Mountain, or Pacific to ensure accurate timestamps for U.S. visitors. While manual updates work well, AI tools can make this process even smoother.
Use Kintsu.ai for Content Management
Kintsu.ai takes content management a step further by allowing you to make updates through simple commands. Instead of navigating multiple menus, you can type instructions like, "Create a new About Us page with sections for our team and company history", or "Add the Careers page to the main menu between Services and Contact." The AI will build complete page layouts with text and images based on your input and place them exactly where you need them in your site’s navigation. This saves time, especially when creating multiple pages or reorganizing your site, so you can focus on crafting your message instead of dealing with technical details.
sbb-itb-42d7c06
Adding Features Without Code
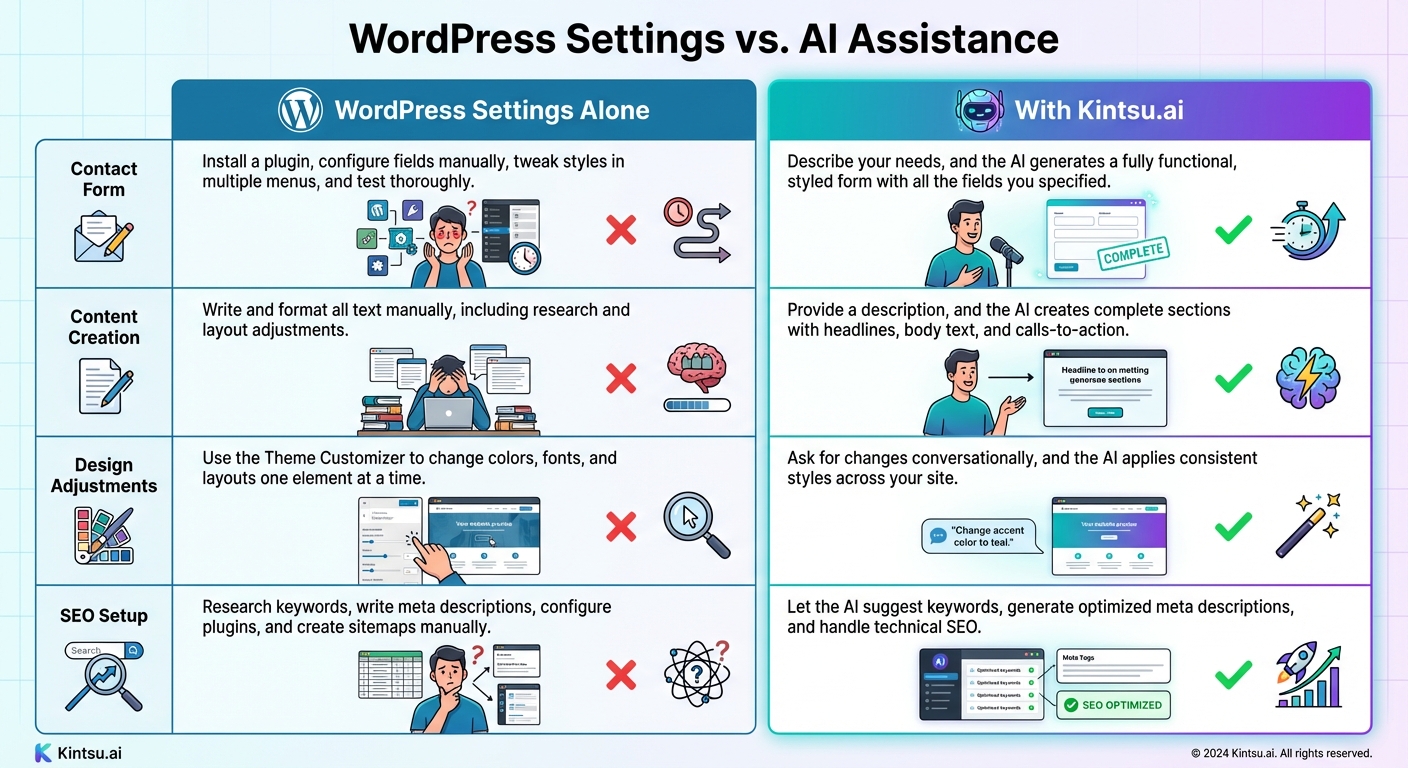
WordPress Manual Settings vs AI-Powered Updates Comparison
Plugins make it easy to expand your site's functionality without needing to touch a single line of code. Whether you want to add a contact form, set up a newsletter sign-up, or embed a map, plugins have you covered. Most plugins include user-friendly settings panels, allowing you to customize features through simple actions like filling out forms, toggling switches, or choosing options from dropdown menus. For instance, with a contact form plugin, you can add new fields, change button text, and specify where form submissions are sent - all through an intuitive visual interface.
Configure Plugins and Widgets
Installing and configuring plugins is straightforward. Head to Plugins > Add New in your WordPress dashboard, search for the functionality you need, and install the plugin of your choice. Popular options include tools for building contact forms, integrating email marketing services, or displaying social media feeds. Once activated, you’ll find the plugin’s settings under Settings or as a separate menu item. From there, you can customize everything - field labels, colors that match your branding, and even notification preferences.
Widgets work similarly but are focused on adding elements to specific areas of your site, like the sidebar or footer. Navigate to Appearance > Widgets, then drag and drop components like search bars, recent posts, or custom HTML into the desired widget area. The locations available for widgets depend on your theme’s layout.
Use Kintsu.ai for New Features
Kintsu.ai simplifies the process of adding new features by letting you use plain language commands. Instead of searching for plugins and manually configuring settings, you can type requests like, "Add a contact form to the bottom of the Services page with fields for name, email, phone number, and project details", or "Create a newsletter sign-up section in the footer with a headline that says 'Stay Updated on Industry News.'" The AI takes care of the rest, ensuring the design and formatting are optimized for American audiences, including localized features like date formats (MM/DD/YYYY), phone numbers (e.g., (XXX) XXX-XXXX), and action-oriented button text.
WordPress Settings vs. AI Assistance
Choosing between manual WordPress configuration and AI-powered tools depends on your needs. Manual methods give you full control over every detail, while AI tools like Kintsu.ai save time and reduce complexity by handling repetitive tasks.
| Task | WordPress Settings Alone | With Kintsu.ai |
|---|---|---|
| Contact Form | Install a plugin, configure fields manually, tweak styles in multiple menus, and test thoroughly. | Describe your needs, and the AI generates a fully functional, styled form with all the fields you specified. |
| Content Creation | Write and format all text manually, including research and layout adjustments. | Provide a description, and the AI creates complete sections with headlines, body text, and calls-to-action. |
| Design Adjustments | Use the Theme Customizer to change colors, fonts, and layouts one element at a time. | Ask for changes conversationally, and the AI applies consistent styles across your site. |
| SEO Setup | Research keywords, write meta descriptions, configure plugins, and create sitemaps manually. | Let the AI suggest keywords, generate optimized meta descriptions, and handle technical SEO. |
Testing and Maintaining Your Site
After making AI-driven updates to your WordPress site, thorough testing and consistent maintenance are crucial to keep everything running smoothly for your audience. Start by testing your site on both desktop and mobile devices to catch issues like broken layouts, missing images, or unresponsive buttons. Don’t forget to check interactive elements - submit a test form or try clicking through buttons to ensure everything works as intended.
Check Updates for U.S. Users
Make sure your site displays U.S.-specific details correctly, such as dates in the MM/DD/YYYY format, phone numbers like (XXX) XXX-XXXX, and prices with the $ symbol. Test all navigation links to confirm they lead to the right pages, and check page load speeds to ensure a smooth experience. Run through key user flows - try adding items to a cart, submitting a contact form, or signing up for a newsletter. If you've introduced new features or adjusted layouts, view them on various screen sizes to catch formatting issues that could disrupt the user experience. Once everything checks out, you can rely on tools like Kintsu.ai to keep your site up-to-date effortlessly.
Use Kintsu.ai for Ongoing Improvements
Kintsu.ai makes site maintenance easier by identifying and resolving issues without requiring technical expertise. For example, you can instruct it with simple commands like, "Update the copyright year to 2026 across the footer" or "Make the About section more inviting." The AI scans for outdated content and adjusts it automatically. This conversational style of maintenance allows you to improve your site continuously without needing to master complex tools or hire outside help.
Set Up a Maintenance Schedule
Once your site is tested and optimized, establish a regular maintenance routine. Back up your site daily or at least weekly to avoid losing important data. Dedicate one day each month to update plugins and themes, and remove any unused ones to maintain speed and security. Apply security updates immediately to protect your site, but for major feature updates, it’s okay to wait a few days and check user feedback in support forums first. Every few months, audit your plugins to ensure they’re still necessary and functional. Use Kintsu.ai to keep your content fresh by giving it specific tasks, like "Review the Services page for outdated info" or "Update the blog sidebar with our three latest posts." Regular maintenance ensures your site stays secure, fast, and relevant for your audience.
Conclusion
Now that we've covered essential strategies and tools, you're equipped to take charge of your WordPress site updates without needing advanced technical skills. Thanks to AI-driven platforms like Kintsu.ai, tasks like updating content, tweaking design elements, and even adding new features can be managed through simple conversational prompts. What once required hours of tutorials can now be accomplished in just minutes.
Start by securing your site with a backup, familiarize yourself with the WordPress dashboard, and test updates before going live. Using Kintsu.ai's user-friendly prompts builds on these foundational steps, enabling you to handle regular updates, refresh outdated content, and make meaningful improvements. As Zander Lourens, Owner and Music Producer at Gratia dei Studio, shared:
AI did most of the work in 5 minutes, where it would've taken me 2 days, including watching a bunch of 'how to' videos.
Consistency is key to keeping your site secure and user-friendly. Set a routine for backups, plugin updates, and content reviews. With Kintsu.ai, you can also ensure your site meets U.S. standards, like using the correct date formats, phone number styles, and pricing displays.
FAQs
How can I use Kintsu.ai to manage and update my WordPress site?
Kintsu.ai works effortlessly with your WordPress site, making it simple to update and manage your website - no coding knowledge required. Using AI-driven tools, you can tweak layouts, improve features, and make instant changes without breaking a sweat.
The platform is packed with intuitive features and clear, step-by-step instructions, so even if you're not tech-savvy, you'll feel at ease managing your WordPress site. With Kintsu.ai, handling website updates becomes a breeze, letting you concentrate on expanding your online reach with ease.
How can I back up my WordPress site to keep my data safe?
Backing up your WordPress site is a must to keep your data safe and ensure you can bounce back quickly if something goes wrong. The good news? You don’t need to be a tech wizard to do it. With WordPress backup plugins or AI-powered management tools, you can automate the process and store your data securely in the cloud.
Here’s how you can get started:
- Install a trusted backup plugin: Head to your WordPress dashboard, search for a reliable backup plugin, and install it.
- Set up the plugin: Most plugins include easy-to-follow setup wizards. Configure it to back up both your site’s files and database.
- Pick a storage location: Popular options include Google Drive, Dropbox, or even an external hard drive.
- Test your backup: To make sure everything works, restore your backup in a staging environment. This step ensures your data is recoverable when needed.
With these simple steps, you can protect your site and avoid any headaches, no coding required.
How can I safely test changes on my WordPress site before making them live?
To experiment with changes without disrupting your live WordPress site, consider using a staging environment. This is essentially a private duplicate of your site, allowing you to safely test updates, experiment with plugins, or adjust your design. Many hosting providers make this easy with one-click staging tools, or you can use a plugin like WPVivid Backup to set up a staging site straight from your WordPress dashboard.
After creating your staging site, log in using the same credentials as your live site. From there, you can make changes, test them thoroughly, and ensure everything works as expected - both in terms of functionality and design. Once you're confident everything is running smoothly, you can push the updates to your live site using your staging tool or plugin. And don’t forget: always back up your site before making any changes, just in case something doesn’t go as planned.